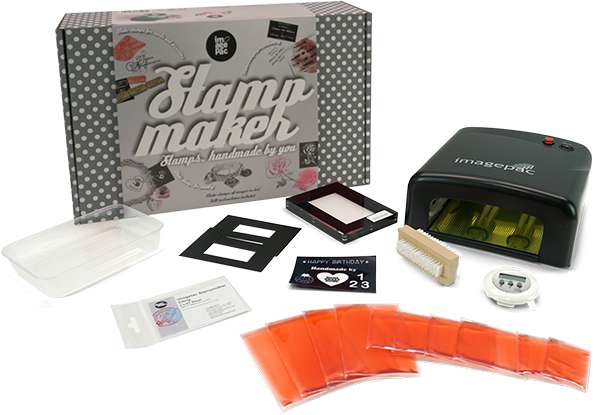
Craft Stampmaker Support
Downloads
Creating your artwork
Advice for Creating Negatives. To make a good stamp, you need a good negative. Check our advice before printing your first negative.
Artwork templates
Making a stamp using a cut out negative
Making a stamp using a die cut negative. You can make a stamp from anything opaque (to stop light) and clear (to let light through) – experiment with black vinyl or card.
Converting a child drawing into silver clay
Making stamps of Drawings for use with silver clay/PMC.*
Fingerprint stamps to press into silver clay
Stamping into metalclay
Making paw print stamps for use with silver clay/PMC *
*Note only applies to craft stampmaker kit 1.9mm sachets
Video Tutorials
Making a stamp part 1
Making a stamp part 2
Printing a negative using a injket printer
Printing a negative using a laser printer
Making a negative using photoshop
Making a photo stamp using Photofiltre Part 1
Making a photo stamp using Photofiltre part 2
Making an embossing die
FAQ’s
The Stamp
Q: Are Stampmaker stamps the same quality as store-bought clear or rubber stamps and which kit should I choose?
A: imagepac Stampmaker stamps are made from Photopolymer resin which can hold very detailed images and make intricate stamps, even photographs. Stampmaker sachets are a pale red color – you can still see through to see where you are stamping. The main difference is that they do not have a sticky back so you need our cling or some EZ Mount to attach your stamp to an acrylic block. These stamps are easy to make and a great place to start. They are perfect for mounting onto self inkers or using with silver clay. Imagepac Stampmaker stamps are 1.9mm thick.
If you would like a Clear stamp with a sticky back to attach directly to an acrylic block, like those in stores; choose the Clear Stamp Making Kit. This resin is a little harder to work with to get times exact. Superclear stamps are 2.55mm thick.
Q: What inks can I use with my stamp?
A: All photopolymer stamps work well with pigment and dye based inks (water based inks). You can use solvent inks but bear in mind that the solvent (including in your stamp cleaner) will degrade your stamp over time. We recommend using a base of a light colored ink or simply clean soon after use and use solvent cleaner sparingly.
Q: How long can I expect my stamp to last?
A: We have tested stamps to a million impressions so it will last as long as you need it to if treated correctly! Use solvent inks sparingly and store out of sunlight.
Q: Can I use any image to make a stamp?
A: The image must be copyright free. Any light and dark image can be made into a stamp.
Q: What is the maximum size stamp I can make?
A: The maximum with this kit is 4x 3/8” (100mm x 62mm). If you are interested in making larger stamps, please register your interest at sales@photocentric.co.uk.
Q: Once I’ve bought the kit do I need to buy anything else?
You will something to make your negative – either a computer and printer or a cutting machine or some black card. You will need scissors, washing up liquid (dish soap) and some warm water. You will only need to buy more imagepac sachets and inkjet film when you run out
Q: How many stamps can I make with the kit?
A: It depends on the size of the stamps you make, the kit contains everything you need to make at least 10 stamps, possibly many, many more depending on the size of your designs eg. You can make several text stamps with one imagepac sachet.
Q: Is an imagepac stamp expensive?
A: No, it will cost you a very small fraction of the cost of a bought stamp and much less than a custom stamp.
Q: Can I heat the stamp with an iron?
A: Yes, as long as it is not in direct contact with it. Just treat it like any normal clear stamp.
Q: Can I use imagepac with embossing powders?
A: Yes, use exactly the same as any clear stamp.
Q: Can I use imagepac on fabric and material?
A: Yes, use fabric and machine washable inks.
Q: Can I use imagepac with precious metal clay?
A: Yes, use exactly the same as any clear stamp. See our jewelry instructions for advice on exposure times and artwork manipulation.
Q: Can I use imagepac on pottery?
A: Yes, use exactly the same as any clear stamp.
Q: Can I use imagepac on silicone moulds?
A: Yes, just use a release spray (silicone release spray or even kitchen oil) then wash the stamp afterwards.
Q: Can I use imagepac on sugar craft?
A: Use just like any polymer stamp. Imagepac is not tested for safety in food use – you may wish to use cling film between stamp and dough/sugarpaste.
The Stampmaker
Q: What is the light in the Stampmaker?
A: It is mainly UVA peak 360nm, you should avoid direct contact with the eyes.
Q: Can imagepac be hardened in normal light?
A: It will be fine in a normally lit room for a minute or so, but will harden quickly in sunlight, store in a closed box.
imagepac
Q: What material is the imagepac?
imagepac is a photopolymer resin. Photopolymer has been used in the printing industry for over 40 years and is used to make printing plates for flexographic printing. It is well known for its imaging ability and its ink transferring ability (to give great impressions).
Q: Is it toxic or harmful?
A: No. Photopolymer is a mild irritant for some. If you get it on your skin, wash with warm soapy water. When hardened it is completely safe to handle.
Q: Can I use just part of my imagepac and keep the rest?
A: No, it is not really practical to shield part of the imagepac to keep it liquid. You should use an imagepac of the correct size. We make different sized imagepacs, just pick the one that is right for your artwork.
Making the Artwork
Q: How do I get the right ink jet printer settings on my printer?
A: Change the paper setting to ‘photo paper matte’
Increase the ink volume (if possible) to maximum
You can draw a little box in word (click insert text box and right click on the border open properties and select black fill). Then print this box on the imageblack film using different print settings and compare against a light to select the darkest.
We recommend HP printers. The paper setting that delivers most ink varies from printer to printer, but try ‘specialty’, ‘presentation printing’ or change the paper setting to‘photo paper matte’.
Ultimately, the black must just stop light, so look at it against the light and see if you can through it! Please see websites and videos for more advice.
Q: How can I make artwork using more than one image at the same time?
A: You can save the image as a jpg and then open as many images as you want in an artwork modifying program (eg. Our online software); this will enable you to re-size them and move them around. You can even do this using Microsoft Word, opening them in a text box.
Q: How do I make text stamps?
A: Use Microsoft Word: Insert a Text box and adjust its size, right click on the border and in Format Text Box, change the fill from white to black. Then in Format font change the color to white. Leave about 1/4”of black border around the edge of the text to keep the floor of the stamp nice and level at the edges.
Q: Can I use any ink jet printer?
A: Virtually all ink jet printers will give you artwork that is black enough to stop light getting through if you optimize the settings.
Q: Can I use a laser printer?
A: Only some will print dark enough, so we recommend ink jet. See website knowledge centre for more detailed information.
Q: What happens if my artwork ink remains wet?
A: If your ink remains wet on your imageblack artwork then you have printed on the wrong side. The printable side is slightly rough to the touch. To tell which side to print on, wet your fingers and press on a corner, one side will stick and this is the side to print on. Take care as the printed film is easily scratched.
Q: Can I use refilled ink jet cartridges?
A: Possibly, but it’s unlikely they will print as black and the quality may not be as good as the manufacturer’s brand. Check the quality of the own brand first and then see if you get the same quality with refilled ones.
Q: Can I use a cheaper ink jet film?
A: It is unlikely OHP film will be black enough. imageblack ink jet film is a very high quality film that uses a sophisticated system to enhance the black and improve your image.
Q: Can I make a stamp from a photograph?
A: Yes, you may wish to watch the video on our website first. Change times in Stampmaker to 10 seconds first exposure, then 30 seconds second exposure to hold detail open. Also use these times for fingerprint stamps.
Q: Do I have to use a printer to make my artwork?
A: No, you can draw with permanent ink pen onto the soft side of the imagepac; onto the film (in negative format); use a cutting tool (cut out a template that is part clear and opaque), or use a mask such as lace. Remember light will go through clear parts to harden the polymer; black stops light and the polymer under it will stay liquid and can be washed away.
Q: My printer won’t print on film, what can I do?
Some printers don’t “see” clear film. You need to trick them by spray mounting white paper and sticking it to the film (spray mount is ideal as it peels off really easily afterwards). Make sure you don’t stick down the side of the film you need to print on!
Washing out the stamp
Q: Why is my stamp not washed out properly?
A: To wash your stamp out you should hold it under a gently running hot tap until the liquid has fallen off, then squirt a generous amount of washing up liquid (dish soap) on it and scrub it in a circular motion until it is clean. Finally, rinse and check against the light.
Q: Can I use soap instead of detergent?
A: Yes, we recommend washing up liquid (dish soap) as it is quicker and better.
Q: Can I use cold water?
A: Yes, but it will wash out faster and easier in hot water (just like greasy dishes!)
Q: What happens if leave the imagepac in the water too long?
A: If left in the water for a long time the plate will turn white and will swell up, this may permanently deform the plate (probably about 1 hour).
Hardening the stamp
Q: Can I make my stamp less tacky?
A: Yes, leave it under the lights in water for a few more minutes, but expect the red color of imagepac Stampmaker sachets to fade.
Q: Can I make my stamp completely clear?
A: imagepac Stampmaker stamps will have a slight residual color. Leaving it longer in the water for the last stage will make them lighter. Use imagepac Superclear for completely clear stamps.
Troubleshooting
Artwork creation problems
How to make negative artwork
You can use the artwork program of your choice such as Corel or Photoshop or free to use programs such as Photoscape or Gimp. You need to invert the image into a negative by doing the following easy steps:
Convert the image to a grayscale (you can ignore this if it is already greyscale or black and white).
Optimize the brightness and contrast. This is to make the blacks strongly black and whites strongly white. If you don’t do this the file can still be converted to black and white, but you may lose some detail.
Convert to black and white. This is called bitmapping and makes the file 1 bit.
Invert the blacks and whites to make a negative.
Artwork is the wrong size
This is an issue with your software. When you have your artwork at the correct size you can send that file to your printer and it will print it at the size determined by your image on your screen and this will be the exact size of your stamp.
If you are using Word you can fix the size by fixing the size of the text box you are typing in.
If you are using an artwork package it will provide the opportunity to re-size an image by either clicking on it and entering the correct dimensions numerically or just by pushing or pulling at a corner.
It is worth clicking print preview before printing just to check that the size looks correct.
Negative making problems
Which printer to buy
All inkjet printers will make a negative, but only some laser printers will print dark enough. If you want a low cost option we would recommend the HP 1050, 2540 or 3055 PSC (Printer/Copier/Scanner) so you can use it to scan and upload drawings as well. Even the lowest cost printers will print dark negatives straight from the printer. Almost all inkjets can print negatives dark enough to use, but you will have to optimize the print settings.
Getting your printer to print black
Negatives have to be black enough to stop light where you don’t want it, whilst at the same time be clear enough to let light through and have the correct resolution to deliver your desired image.
We recommend you use an inkjet printer. Nearly all inkjet printers will print dark black enough to use as a negative, but you will have to select the optimized printer setting.
Ensure the file you are sending to your printer is black and white, not color or grayscale.
Use our imageblack inkjet film and print on the coated side that sticks to a damp finger. Do not use standard OHP
Find the optimized print setting by printing a small black box using different print settings and look at it against a light- use the darkest black one. You could try all the settings from the shortcut menu (typically ‘specialty printing’ or ‘presentation printing’ work best) or change the paper type to ‘matte’ or ‘photo paper matte’
If available also increase the ink volume.
We recommend any HP inkjet, the basic PSCs (printer copier scanner) type in any range work well.
Your inkjet negative is still wet
There are two reasons for this, you have either inserted the film in the printer the wrong way round and are printing on the uncoated side, or you are trying to deliver too much ink for the film to absorb.
Always print on the side that will stick to a damp finger, this is less shiny and slightly rougher, the other side is completely non-absorbent.
In the rare case that you have selected a print setting that is dropping down so much ink that the film is just over-loaded, select a less ink heavy print option, select a less absorbent paper or reduce the ink volume, but do still check the black stops light.
Using laser printers
Not all laser printers will print black enough. We recommend the HP brand. If you have the option you should increase the toner density, this is obtainable via the Start menu, then access the control panel and in ‘Properties’ of your laser printer remove toner saver or increase the density. You should use our imageblack laser film as it is optimized to be receptive to toner. You will have to darken the printed film with solvent, the easiest way is to buy an aerosol of toner density spray, but some printer types can be wiped with white spirit (turpentine) and heated with a hot air gun to turn the grey toner jet black.
You have a solid stamp
There are two possible causes: either your negative is letting light though (which is the most likely one) or you have made it incorrectly. In all probability the cause is that your negative is letting light through, so we suggest you look at this first.
Negative problem– there are three simple checks to find out where your problem lies:
Make sure that you sent a Black and White file to your printer instead of a grayscale or color file. Printing is a binary process, it will either drop ink down or not, it prints gray by printing small black dots surrounded by white. So selecting black is always the darkest.
Summary- Make sure your artwork is a black and white file, not grayscale or colour.
Use a printer setting that delivers maximum ink. Printers offer many different settings from economy to photo quality. The darker the black, the more light it will stop and the better your stamp. Select an absorbent paper setting like ‘photo paper matte’ or ‘matte’ to deliver the most ink. If you have a shortcut menu one of those options will be the darkest black, to find which it is print a small black box using each of them in turn and look at them against a light to find the darkest black. If possible increase the ink volume. For more information on this visit http://www.photocentric.co/PRINTERSETTING.asp
Summary- Choose the darkest print setting delivering most ink, typically change the paper to ‘matte’ setting.
Always black-off the area around small negatives. Use the template supplied if you are
making an A8 (small) sachet, or surround a small negative with card or anything that will stop light to cover the base of the clamp.
Summary- Ensure that the entire area of the base of the clamp is covered with negative or card.
The film supplied only works with inkjet printers, not laser. Do not use OHP film, the imageblack film supplied is optimized to print dark black. You can always print dark black directly, printing the same film twice to darken may give you alignment issues and if you stick two negatives together you will have to increase the second exposure time by 100 secs.
Process error– this is the least likely cause, but there are three possibilities
You didn’t assemble the sachet the right way round, the soft side should be next to the negative with ‘imagepac’ readable from
You inserted the clamp with the imagepac up for longer than the recommended times. Make sure that on the vital first exposure with the imagepac open to the light, it is only in the stampmaker unit for a maximum of 6 seconds for the red 1.9mm sachets or 15 for the clear 2.55mm
You let the imagepac be exposed to sunlight or left it close to the UV unit before you washed away the
You have a liquid stamp
This is the easiest problem of all to correct – the cause of the problem is too little light reaching the imagepac sachet.
Make sure your stampmaker light unit is warmed up before use, do this by turning it on for 1 minute before inserting the clamp.
If you are using two negatives or you have printed your negative on vellum (opaque or frosty) film you will need to increase the second time by 100 secs.
Stamp problems
Not enough detail to your stamp
If you have lost detail, it is either because you didn’t have the detail on your negative or you didn’t make the stamp properly.
No detail on the negative
This is either because the file was grayscale and not black and white or because your negative was not black enough. You can check whether the file was one bit black and white by checking the properties of the file on the screen. If you expand the image size in an artwork program to the pixels you will either see black & white squares or greyscale ones, alternatively, just save the file as a black and white file (called bit-mapping). To check whether the artwork is dark black look at the negative against a light, if you can see through the black parts then it isn’t dark enough.
You lost the detail in the stamp making
This is because you either over-exposed the stamp or didn’t wash it out properly. Over-exposure means that you have shone too much light for the second exposure. Reverses (such as the centres of ‘e’s) fill in and lines become bolder when this time is too long. For artwork with a lot of clear areas on it and small areas of black, you should reduce the second time by approx.20 seconds. It’s very easy to wash stamps properly, use lots of running hot water, detergent and brush vigorously; if your stamp is made properly it will not be damaged by the washing.
Level of detail you can hold
The detail of the stamp is a function of two things, the quality of your negative and the optimization of your second exposure time.
So set your printer to print on max dpi, with inkjet printers this should be 1200dpi at the minimum. Make sure your file is created at a minimum of 300dpi, ideally 600dpi. To hold the finest of text you should use a second exposure that just makes the fine lines strong, but doesn’t widen it. With stampmaker 1.9mm (red) using a first time of 6 seconds, the minimum second time is 60 seconds, although 100 seconds is safer. If you reduce the second time the text will be finer, this is easier to do with a higher floor, which means a longer first time and the longest you can leave it in is 10 secs.
Stampmaker will comfortably make 4 point text, if the negative holds it.
Stamp is still sticky
Sometimes your stamp can be still sticky, it varies according to the type of water used and the amount of light. Make sure the stamp is thoroughly dry before testing how dry the surface is.
The simplest way to get your stamp surface really dry is just to extend the time under water under lights, you can leave it there for as long as you want with no ill- effects, but bear in mind it will absorb water so will need drying for longer. 6 minutes should be long enough to get any stamp dry.
You can adjust the water to make it reduce the stickiness on the surface by pouring a little washing up liquid (or dish soap) into the post exposure water tray.
If you really don’t have the final dryness you need, you can dry the stamp thoroughly before placing it under the water for final hardening, this will also make it shinier. You will also find that you can do the final hardening surprisingly effectively using sunlight.
You can’t peel the back off the imagepac
Stampmaker 1.9mm (red) has sachets with a rigid back that is always attached to your stamp, you cannot remove it. Use imagetac cling to attach your stamp to your mount. 2.55mm clear imagepac sachets have a removable back.